
Products and stocks
Products differ from stocks only in that stocks are available in the warehouse, while only a few properties are defined for products for inclusion in shopping lists, etc. For example, the best-before date and price are only relevant for stocks.
Products and stocks are searched for and sorted from many locations according to different criteria, always presented in lists. If there is not enough space on the display, the content can be scrolled.
In the Pro version, you can use the menu to sort the stocks to be displayed according to various criteria.
Alternatively, such a list can be narrowed down by searching for name components after clicking on ![]() .
.
If the option "Work with selection in lists" is enabled in the settings, a checkbox is displayed in front of each inventory item/product, which can be used to select items for later bulk actions .
When a product/stock item is selected in the list, a pop-up menu appears from which the desired action can be selected:
Most of the options are self-explanatory.
By selecting 'Edit stock' / 'Edit product', the individual properties of the stock / product can be changed. As a shortcut, you can also edit by long pressing on the list item, i.e., without going through the menu.
When you select 'Delete product', the product is deleted along with all associated (same-name) stocks; when you select 'Delete from storage location', only the individual stock is removed.
The 'To requirements planning' item is displayed for stocks and allows you to directly view and edit the associated product.
The 'To stock' item is displayed for products and allows you to directly view and edit the associated stock. If there are several associated stocks (with the same name), a list of the associated stocks is displayed first, and you can select the one you want.
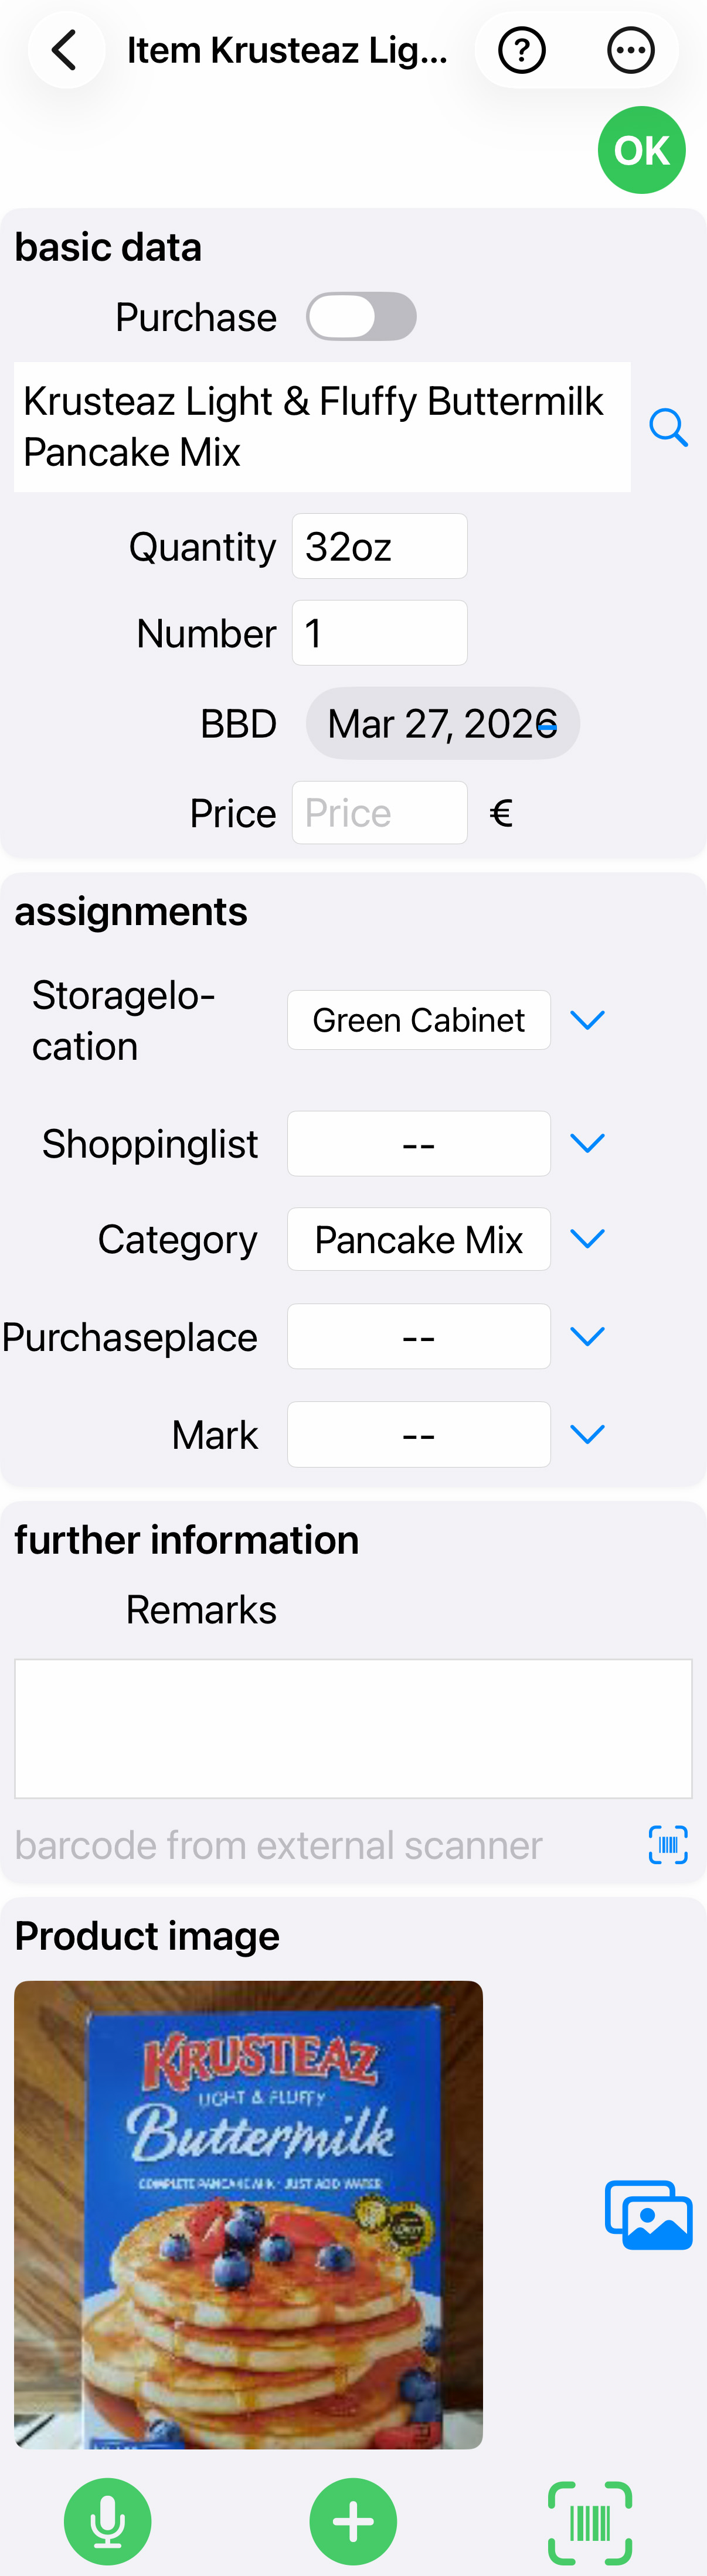
The properties of stocks and products can be edited at any time using the following screen, although much of this is usually done automatically in specialized program sections to speed up the process:
The button ![]() creates a copy of the stock item so that it can be saved again with a different storage location or different best-before date, for example.
creates a copy of the stock item so that it can be saved again with a different storage location or different best-before date, for example.
The ![]() button is only available for new stocks. It starts the barcode scanner, which is used to automatically insert the article text belonging to the barcode for the new stock. If the barcode is difficult to read, it can also be entered manually by pressing and holding this button.
button is only available for new stocks. It starts the barcode scanner, which is used to automatically insert the article text belonging to the barcode for the new stock. If the barcode is difficult to read, it can also be entered manually by pressing and holding this button.
The ![]() button starts voice input. The description can then be spoken again. Voice input recognizes certain keywords (both at the beginning and in the middle of the text, even multiple times) that have a special effect:
button starts voice input. The description can then be spoken again. Voice input recognizes certain keywords (both at the beginning and in the middle of the text, even multiple times) that have a special effect:
- QUANTITY
The following part of the spoken text is intended for the 'Quantity' field (e.g., 125g). - NUMBER
The following number in the spoken text is intended for the 'Number' field. - Best before date or shelf life
The voice input only applies here if 'Best before date input with numeric keypad' is set in the settings - otherwise there is a selection control here, activated with +.
The following part of the spoken text is for the'Best before date' field. Normally, this is a date in the format dd.mm.yy
However, special formats are also accepted in voice input :- 5 days ~ current date + 5 days
- 2 weeks ~ current date + 2 weeks
- 1 month see above
- 3 months see above
- 1 year see above
- 2 years see above
- 20 ~ the 20th of the current month (or the next month if the 20th of the current month has already passed)
- 15.11 ~ November 15 of the current year (or the next year ...)
- PRICE
The following part of the spoken text is intended for the 'Price' field - COMMENTS
The following part of the spoken text is intended for the 'Comments' field
If the voice input begins with a keyword, the item description is not changed.
The ![]() button ends the input and saves the new/changed stock.
button ends the input and saves the new/changed stock.
The button ![]() starts the search for another stock item, with the visible name being preset as the search value.
starts the search for another stock item, with the visible name being preset as the search value.
Depending on the product type, the volume ('l' or 'ml') or weight ('kg' or 'g') of a single item is specified under 'Quantity' – possibly also a multiple specification (10 bags) for multiple packages. In any case, text can be entered here that is not further checked.
Under 'Quantity', the number of individual items that you want to buy/have bought is specified. Therefore, only a number can be entered here – with decimal places if necessary.
When the 'Buy' button is clicked, its embedded checkbox is 'checked' and the item is added to the shopping list again, in this case to the default shopping list named'-Shopping-'. The 'Shopping list' button is labeled with the name of the shopping list.
Under 'Best before', the best before date according to the manufacturer's specifications or your own assessment is entered. Here, a date in the format dd.mm.yy must be entered or one of the possible abbreviations, which are then automatically converted into a date:
- 5t ~ current date + 5 days
- 4w ~ current date + 4 weeks
- 3m ~ current date + 3 months
- 15 ~ the 15th of the current month or the following month if the 15th has already passed
- 14.11 ~ November 14 of the current year or the following year if November 13 has already passed
- 2.3 ~ March 2 of the current or next year
- 0810 ~ October 8 of the current or next year
- 040520 ~ May 4, 2020
- all other meaningful date abbreviations with or without periods
If no input field is visible due to the settings, a rotary date picker can be displayed by clicking the + sign.
If, for any reason, a very old best-before date needs to be entered (a best-before date prior to January 1, 2019, is normally rejected as invalid due to suspicion of a typo), this can be achieved by entering a special format:
YYYYMMDD, e.g., 20181024 for October 24, 2018
However, the best-before date check can also be disabled in the settings.
Each time the app is started, a list of stocks whose best-before date has been reached or exceeded may be displayed as a warning (but this can also be disabled in the settings ).
The value under 'Price' is for informational purposes only – its content is not checked further, but can be used in totals together with the quantity if desired.
When the 'Storage location' button is pressed, a menu opens from which the desired storage location can be selected, here as an example:
|
Storage location
|
The following applies:
- -- (not specified) No specific storage location is specified for the stock
- + (add) The intended storage location does not yet exist: it must be created beforehand - the configuration menu for a new storage location appears. If an existing storage location is entered here and the field is exited, this storage location is displayed with its sub-storage locations and can be edited - e.g., to add a new sub-storage location
- Clicking on a storage location without an arrow on the right-hand side: the storage location is selected
- Clicking on a storage location with an arrow on the right-hand side: the storage location contains sub-storage locations – a submenu appears (in the example for TK cabinet).
- If the generic term is clicked in the submenu (here TK cabinet), the generic term is also adopted as the storage location and no sub-storage location
The same applies to the 'Shopping list', 'Category' and 'Place of purchase'buttons as to the 'Storage location' button:
A menu appears for selection with selection points, which may contain sub-selections depending on the individual configuration (indicated by the arrow on the right-hand side).
With 'opened', you can indicate that the stock has already been opened.
The character string under 'Remarks' can contain any text, which can also be searched for.
The link symbol behind 'Comments' can be used to call up a website belonging to the stock. However, this requires that the complete web address with the leading http:// or https:// be entered under 'Comments'.
If you want to add additional text to the
web address in the comments, you can mark the end of the web address with a vertical line and save any comment text after it.
A special case is the 'Mark' button, which can be freely configured via the 'Configuration' button. This value can later be used as desired in search processes, etc.
A photo is displayed if this has been selected in the settings and if a photo is associated with the inventory item. If no photo exists, a camera icon is displayed to take a photo and a gallery icon to select a photo from the gallery.
The following options are available in the edit menu:
- As always, clicking on
 opens the offline help text for the page; if this is not sufficient for clarification, the detailed online help text can be accessed via the help button contained in the help text.
 - Clicking on
 (Search for name) opens the additional options menu, which in this case allows you to search for specific parts of names (using the keyboard or voice control):
By selecting 'go to requirements planning' from the inventory screen, you are taken directly to the product screen.
By selecting 'to stock' from the product screen, you will either be taken directly to the stock screen or to the stock selection if there are several suitable items.
By selecting 'Get barcode description from server', you can send another request to the server to retrieve the description associated with the barcode if it is already in the inventory (e.g., if there was no internet connection in the basement when the inventory was recorded using barcodes).
'Assign barcode' allows you to add a barcode to a stock item/product at a later date.
By selecting 'storage transfer', you can 'move' all or part of a stock item from its current storage location to another location.